Ronin Global
  • Home
  • Articles
    • How-To: Smartsheet Help
    • Enhancement Requests: Smartsheet
    • How To: Zapier Help
    • Business Practices
    • Posts by J. Craig Williams
  • Smartsheet
  • Zapier
  • References
    • Color Codes
  • About Rōnin Global
    • About Craig
  • Home
  • / How To: Zapier Help /
  • How-To: Smartsheet Help
  • /
  • Smartsheet: Fixed date upon completion

Smartsheet: Fixed date upon completion

2016-12-11How To: Zapier Help, How-To: Smartsheet HelpFixed Date, Zapier. Smartsheet

One of the FAQ’s in the Smartsheet Community is a asking for a way to have a “Completion Date” cell be updated automatically when a user sets a status to ‘completed’, a percent complete to 100%, checking a “Done” checkbox, or dozens of other ways a task can be marked as finished.

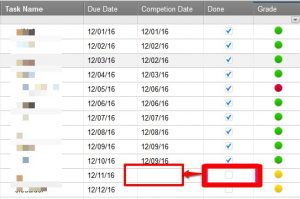
For example, a user will check that their task is completed. It would be nice if the Completion Date cell to the left would fill in automatically.

completion_date

Smartsheet does not have a ‘toggle’ feature – that is a formula that will set a date to “today”, will set it to “today” again tomorrow and the date will be updated (improperly in all likelihood) in the future.

I’ve had a work-around to this for a while, but it required that no user updated anything else in the row after marking the row completed. In some use cases, this works. For many, it won’t. I won’t bother showing that formula here.

Using Zapier (www.zapier.com), the solution is quite easy, once you work out the kinks.

This requires a Basic account or higher, because it uses a multi-step Zap (what Zapier calls an automated process). Typical Zaps are trigger-action pairs. This one throws another filter action to prevent future updates to updating the row again.

completion_date_zap

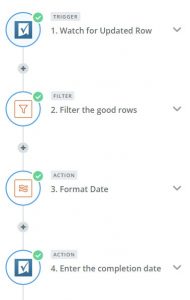
The Zap’s trigger will be an Updated Row event. That’s one of the common triggers for Smartsheet in Zapier.

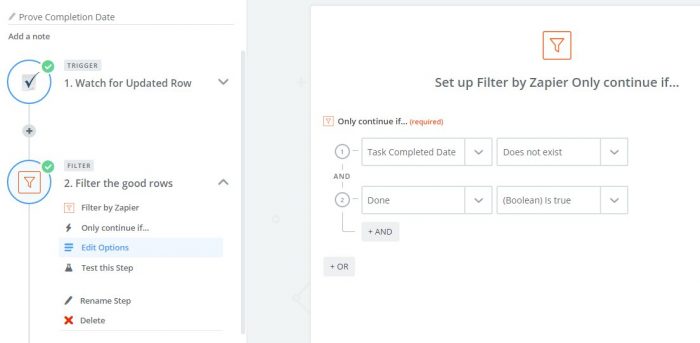
A Filter is next, to only pass on the rows that have a “Done” check box and an empty “Completion Date”.


An Action to reformat Smartsheet’s Modified Date/Time to only the date gets passed back to the updated row and the Completion Date is entered.

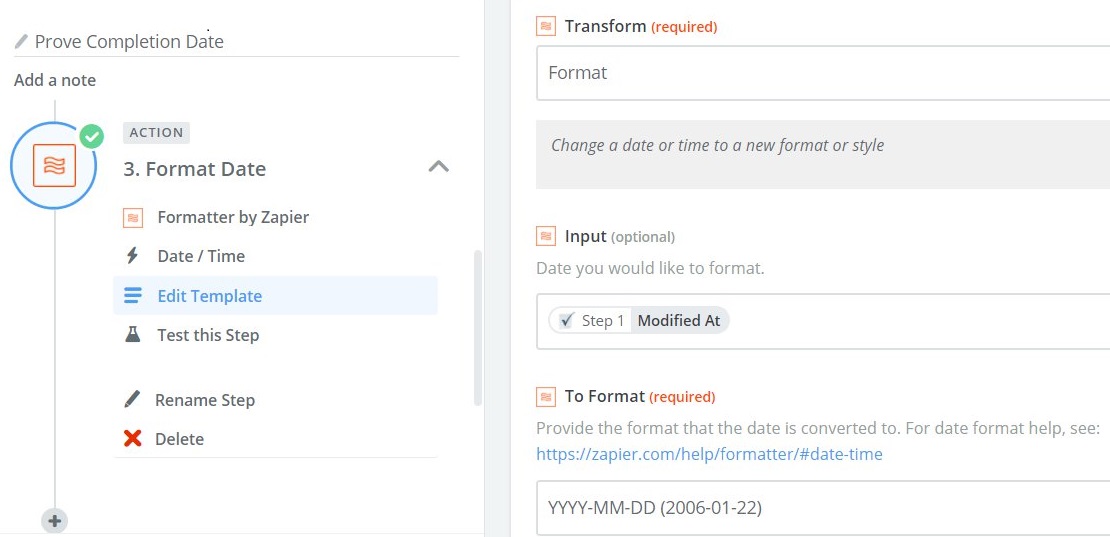
Step 3 is an Action trigger using Zapier’s own Formatter app to reformat the output of Step 1 to a more friendly looking Date format. Smartsheet would recognize the standard format, but I’ve seen instances where it was not predictable. Rather than argue with it, I just force it to be the Date format I want.

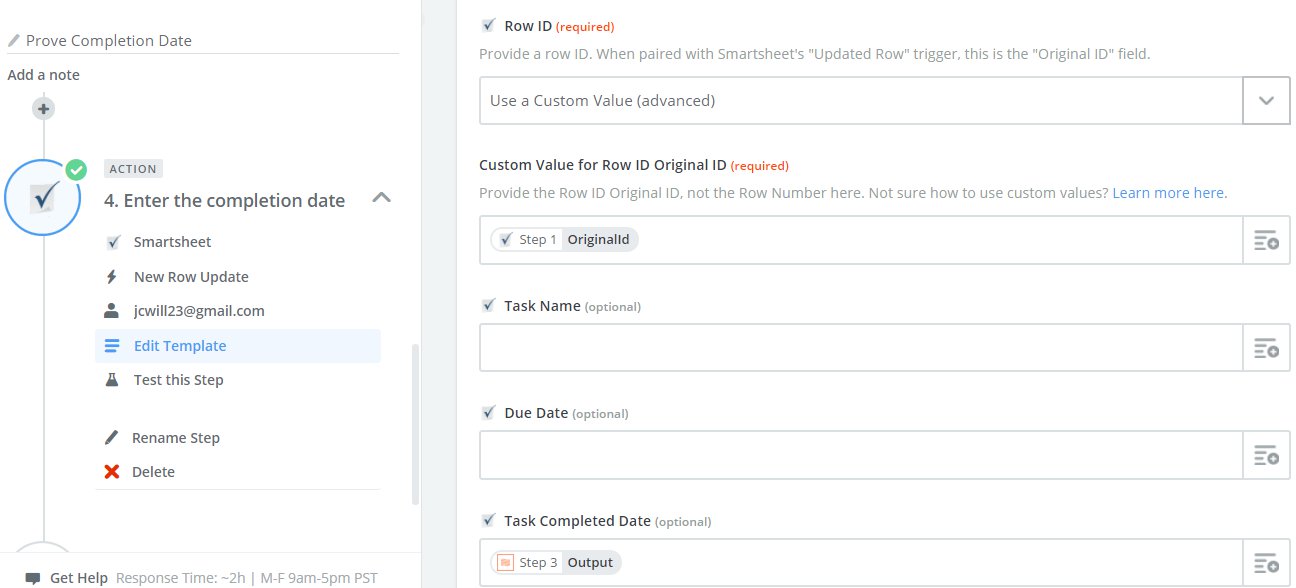
Step 4 is putting the data back into Smartsheet now that it has been filtered and reformatted to my liking.

And that’s all there is to it.

Update: 2017-02-20

The sheet is located here.

You can add an entry to my testing sheet using this WebForm. The WebForm will add a new row to my sheet with the [Done] checkbox checked. Depending on timing, the Zap will run shortly thereafter (they run every 15 minutes on the Basic Plan) and automatically update the [Task Completed Date] column with today’s date.

To test that the [Task Completed Date] does not update when the row is later changed, the [Task Name] can be updated later (at least a day after the initial entry).

If anyone would like help setting up this Zap or support in integrating other tools using Zapier, I can be contacted at craig.williams@ronin-global.com to receive a price list and our availability.

Update: 2017-05-17

Provided more details on steps 3 and 4.


Comments

Craig 2017-02-20 at 06:49 - Reply

I have come across this post a few times and it makes no sense. My understanding no doubt.

I get everything except for the part where you:
1. update a single cell only
2. update the cell with today’s date

    Ronin Global 2017-02-20 at 09:45 - Reply

    I’m not sure where the confusion lies, however I added an image of Step 3 in the Zap where the filter occurs on whether to update the [Task Completed Date] column or not.
    In addition, I’ve add a link to a WebForm where users can create new entries with a pre-checked [Done] check box and within a few minutes see the update. A link to the partially editable sheet is also now available.

    Since any testing counts against my monthly Zap limits, these links may be turned off without notice.

    Let me know if that clears things up or not.

    –Craig

    Flora 2017-05-08 at 19:26 - Reply

    Great weblog right here! Adnotiidally your website quite a bit up very fast! What web host are you using? Can I am getting your associate hyperlink to your host? I wish my web site loaded up as fast as yours lol

Rui 2017-03-20 at 09:39 - Reply

Sorry,

Still miss what to input in step “Row ID” of “Set up Smartsheet Row Update”

Thanks for your time

    Ronin Global 2017-03-20 at 09:52 - Reply

    In Zapier, you need to get the Original ID from Step 1.

    In Choose Row, select “Use a Custom Value”.
    In Custom Value for Choose Row ID select Original ID.

    Here’s the Zapier help on that:

    Updated Row

    Hope that clears it up.

    –Craig

Lee 2017-05-17 at 09:03 - Reply

I’m confused as well. I can follow along and setup the filter. This statement is where I get lost – “An Action to reformat Smartsheet’s Modified Date/Time to only the date gets passed back to the updated row and the Completion Date is entered.” That needs a screenshot perhaps, or just better wording.

    Ronin Global 2017-05-17 at 14:39 - Reply

    I’ll add more detail on steps 3 and 4.

    Craig

Rach 2017-09-01 at 02:41 - Reply

Hi,

This is a fantastic work around if you are only concerned about adding this feature to 1 or a couple of sheets. What about large volumes of sheets, and needing to apply it to every new sheet that is created? I am only a beginner at Zapier, but as it the start of trigger is a change to something within a sheet, I assume you need one zap for every sheet, or at the very least need to update the zap to incorporate new sheets. Any suggestions for someone working with a large quantity of (template) task sheets in various (template) workspaces?

    J. Craig Williams 2017-09-17 at 12:13 - Reply

    Yes, for large numbers of sheets, I use the API (Python).
    It is unfortunate (for me) that while Zapier supports Python code for actions, it does not (and last I checked, has no intention to) support Python 3+. If they did, I could use Zapier for the web-hook.

Andrew 2017-10-02 at 07:53 - Reply

What can we do if “OriginalID” isn’t showing up as an option in Step 4? I set the “Row ID” field to “Use a Custom Value (advanced)” but in the “Custom Value for Row ID Original ID” field, “OriginalID” isn’t an option.
Maybe I’m misunderstanding how this is supposed to work.
Thank you for the tutorial.

    Andrew 2017-10-02 at 07:58 - Reply

    Nevermind, I think I understand what I was doing wrong. Sorry.

      J. Craig Williams 2017-10-02 at 08:11 - Reply

      Andrew,

      Thanks for the question and great that you figured it out.
      Sometimes it takes a bit for Zapier to ‘refresh’ (I’m not sure if that is the right term here, but there appears to be a waiting period … sometimes) before you can see the OriginalID

      If you are impatient, then here’s an additional trick:
      1. Pick any column and select any of the columns. You”ll see something like “Step 1 Start Date” (I chose Step 1 as the source and the [Start Date] column as my column)
      2. Select that and hit Ctrl+C to copy it to your clipboard
      3. Paste it somewhere (like to a text editor) – you’ll see something like this: {{26954737__Start Date}}
      – the number is the source ID and the Start Date is the column. Change __Start Date to __Original ID … {{26954737__Original ID}} and then paste that into your Zap. It will change back to the image and you now have the Original ID.

      I hope that is clear.

      Craig

Andrew 2017-10-24 at 09:08 - Reply

I tried using the trick you mentioned about where you can change the it manually. When I try to test the Action using that method, Zapier tells me “Required field “Row ID” (ROW_ID) is missing.”

Not really sure what I’m doing wrong. Is OriginalID a value unique to your sheet or is a part of every Zap that uses the Smartsheet Updated Row trigger?

https://imgur.com/a/HYvZh

J. Craig Williams 2017-10-24 at 09:15 - Reply

It is a part of every Zapier (that has the appropriate Trigger).

Ruben 2018-01-11 at 13:11 - Reply

You mentioned that this requires a Basic Zapier account or higher, is the Basic account the free one?

    J. Craig Williams 2018-01-11 at 13:49 - Reply

    No, the Zap uses a multi-step Zap, which requires the Basic license (I see they now call it “For Work”).
    The Filter step (step 2) is important to making sure you aren’t getting false positives on the changes to the row in Smartsheet.

    Thanks for the question.

    -Craig

Write a Reply or Comment Cancel reply

Your email address will not be published. Required fields are marked *

This site uses Akismet to reduce spam. Learn how your comment data is processed.

Archives

  • May 2019
  • December 2018
  • November 2018
  • October 2018
  • September 2018
  • August 2018
  • July 2018
  • February 2018
  • November 2017
  • June 2017
  • May 2017
  • April 2017
  • March 2017
  • February 2017
  • January 2017
  • December 2016
  • November 2016
  • July 2016
  • May 2016
  • April 2016

Calendar

December 2016
M T W T F S S
« Nov   Jan »
 1234
567891011
12131415161718
19202122232425
262728293031  

Categories

  • Articles
  • Business Practices
  • Enhancement Requests: Smartsheet
  • How To: Zapier Help
  • How-To: Smartsheet Help
  • Politics
  • Posts by J. Craig Williams

@2017-2021 Ronin Global | Theme by speakinginvector