Smartsheet: A Different (Maybe Even Better) Send Row

Anyone that uses Smartsheet should probably know that the user can send a row with a few clicks of the mouse and some typing. This will send the chosen user(s) an e-mail copy of the row(s). The e-mail provides a convenient link back to the sheet that contains the row.
Unlike some of Smartsheet’s other features that send e-mails, each Send Row is a unique event and requires a minimum of four mouse clicks if there is no change to the default content or there is more than one recipient.
What follows is a different way using Zapier. It might even be better, in certain use-cases.
The work-arounds that I develop for software I use like Smartsheet fall into several categories, discussed here. I would place this work-around as At Risk. It could be easily made obsolete by some changes to the Send Row functionality in Smartsheet.
Set up the Sheet
The Basic version of this Zap allows the user to:
- enter the part of the e-mail message or to leave it as the ‘standard’ message,
- enter the email address(es) for the e-mail recipient(s),
- click a check box to initiate the Send Row functionality.
In Smartsheet, add three new columns:
- [Send Row Now] as a Check Box column,
- [Send Row Message] as Text/Number type column,
- [Send Row To] as Text/Number type column.

Set up the Zap
In order to use this Zap, at least a Basic account will be needed, as the Zap utilizes multiple steps.
In Zapier, there are four steps.
Step 1: The Zap triggers on an Updated Row.
Step 2: The row is filtered on [Send Row Now] checked.
Step 3: The row is e-mailed by Smartsheet’s Send Row feature.
Step 4: The [Send Row Now] is unchecked for the next time using the New Row Update action.
Setting Up Step 3
Step 3 is the heart of this method.
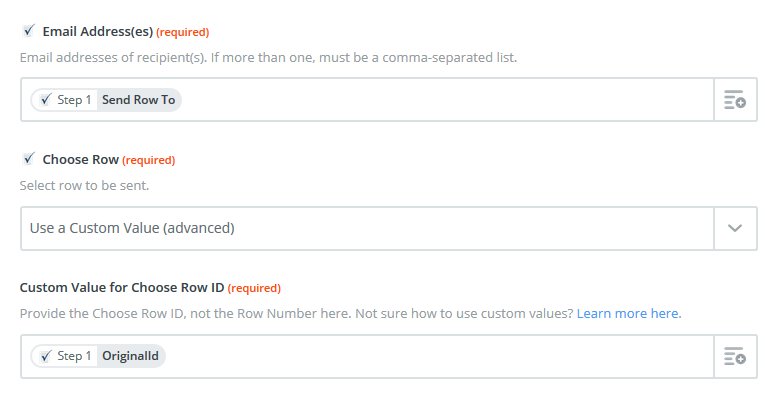
The Email Addresses are retrieved from the [Send Row To] cell in Smartsheet. It can be hard-coded in the Zap directly, but in this case it limits the flexibility of the feature. Multiple email addresses can be entered by separating with a comma and no spaces.
The Row to be sent used the OriginalId from the Step 1. This is just Zapier details and can be found in their documentation if one runs into trouble. There are some quirks that will make sense after repeated use.

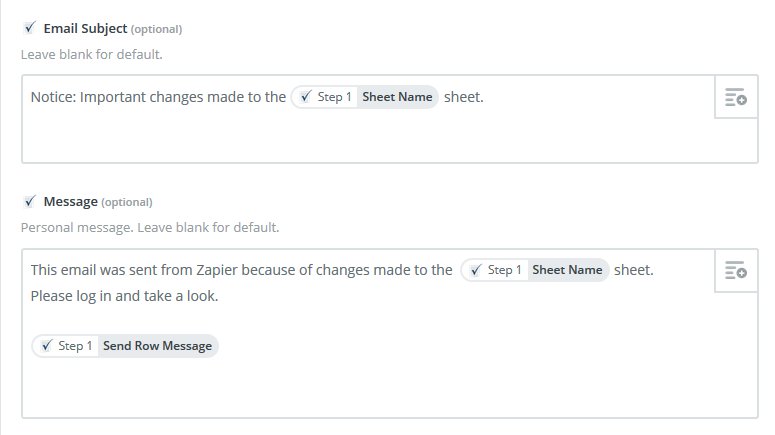
I’ve set up the Email Subject and Message to be partially standard wording and to pick up the remainder from the Sheet Name and the [Send Row Message] cell.

This allows the Zap to be quickly duplicated for other Sheets or messages without extra effort.
Lastly, the three options for whether the user (the one setting up the Zap) gets an email and whether Attachments and/or Comments are sent with the e-mail are selected.
Setting Up Step 4
Step 4 is added to turn off the [Send Row Now] check box so that the Send Rows only go out when a user checks the box. The New Row Update action is used for this.
Test, Refine, Release, and Usage
With the Zap set up, test it. Make whatever modifications are desired and then roll it out to the team.
This Zap can work off the any sheet, but each will be a separate Zap. To perform the Send Row, the user
- updates [Send Row Message] and [Send Row To] if desired or necessary,
- when ready, the user checks the [Save Row Now] check box,
- and saves the sheet.
The Zap will trigger on the Updated Row.
Comparison of This Method with Standard Send Row Feature
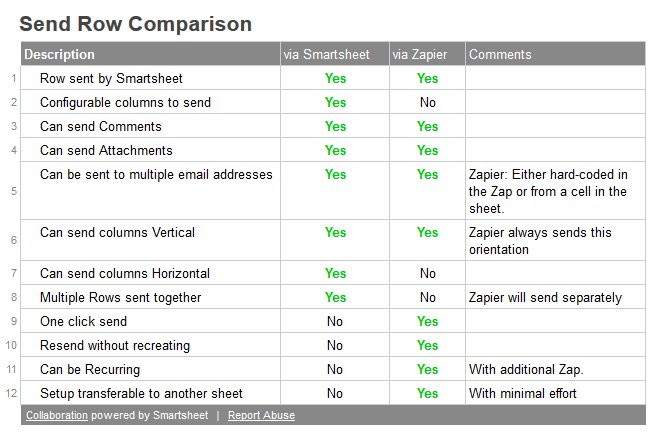
As show in the comparison chart above, what is gained in ease of use (one click if the default e-mail(s) and message are used) and less preparation when changing what is sent (Smartsheet does not save the Send Row’s that have been sent for reuse), there are few things that are lost.
If the row is easier to understand in a Horizontal orientation, Zapier does not allow that.
If only certain columns are to be sent, Zapier does not allow that either.
When sending multiple rows, Smartsheet sends a single e-mail while the Zap works on each individual row separately, so separate e-mails are sent.
Advanced Versions
There are several improvements that can be made to the Basic Zap outlined here. Most of these do not require additional Steps in the Zap, only refinements to the existing ones. There will be additional changes required to the Smartsheet Sheet.
Here’s some of the ones I’ve come up
with. I’d enjoy hearing about other improvements that could be made.
- Allow user to choose to send Attachments or not
- Allow user to choose to send Comments or not
- Have Zap remove e-mail addresses and/or the message automatically after the row is sent.
- Set up a recurring Send Row. This would require an additional Zap, at least the way I do this now.
- Set up default e-mail address and/or message to be used if user does not enter one or both for the current Send Row instance
- Capture a log of rows sent.
That should do it. As always, I’d enjoy reading your comments. If you need support in setting up this or other functionality in Smartsheet or Zapier, please contact me.

Comments